Foggy or yellowed headlights can compromise your safety on the road. Polishing them at home offers several advantages. Restoring your headlights can boost visibility by up to 140%, while enhancing light output by 3.4 times for better night-time driving. Additionally, learning how to polish car headlights at home saves money. DIY polishing costs around AED 85, compared to professional services that range from AED 320 to AED 450. This affordable solution ensures you maintain clear headlights and safer driving conditions.
Key Takeaways
-
Cleaning your headlights at home can make them 140% brighter. This helps you see better and stay safer at night.
-
You can use things like baking soda or toothpaste to clean cloudy headlights. These are cheap and work well for small problems.
-
Taking care of your headlights often, like adding UV sealant every few months, keeps them clear and lasts longer.
Materials Needed for Restoring Headlights at Home
Essential tools and materials
To achieve professional results at home, you need a few basic tools. Start with sandpaper in varying grits, ranging from coarse (400) to fine (2000). These grits help remove oxidation and smooth the surface progressively. A polishing compound is essential for restoring clarity and shine. Microfiber cloths are ideal for applying products and buffing the headlights without scratching them. For beginners, consider using a headlight restoration kit. These kits often include sandpaper, polishing compound, and UV sealant, making the process straightforward.
Household alternatives for cleaning foggy headlights
If you prefer a DIY approach, household items can work effectively for light cleaning.
-
Baking Soda Method:
-
Mix a paste using two parts baking soda and one part water.
-
Apply the paste to the headlights and rub gently in circular motions.
-
Rinse thoroughly and use a vinegar solution to neutralize residue.
-
-
Toothpaste Method:
-
Choose non-gel toothpaste containing baking soda.
-
Apply a small amount to a microfiber cloth and rub gently over the surface.
-
Rinse thoroughly and buff with a dry cloth for a polished finish.
-
These methods are cost-effective and suitable for minor fogging, but they may not match the results of professional-grade products.
Protective items to ensure safety
Protecting your car and yourself during the restoration process is crucial. Use painter’s tape to cover the edges of the headlights and shield the surrounding paintwork. Gloves prevent direct contact with chemicals, ensuring your skin stays safe. A well-lit workspace minimizes errors and enhances precision. Prioritize safety to achieve the best results without damaging your vehicle.
Preparing to Polish Car Headlights at Home
Cleaning the headlights to remove dirt and debris
Before you begin polishing, ensure the headlights are free from dirt and grime. Start by washing them with soap and water using a microfiber cloth. This step removes surface-level contaminants and prepares the headlights for deeper cleaning. For stubborn oxidation or cloudiness, apply a small amount of toothpaste or a baking soda paste. Rub gently in circular motions, then rinse thoroughly. If the headlights remain foggy, consider using a headlight restoration kit for more comprehensive results. Regular cleaning not only enhances visibility but also prevents oxidation and grime buildup, ensuring your headlights stay clear for longer.
Protecting the car’s paint with painter’s tape
To avoid accidental damage to your car’s paint, use painter’s tape to mask off the edges around the headlights. This precaution creates a protective barrier, allowing you to focus on the restoration process without worrying about scratches or chemical spills. Ensure the tape is applied evenly and securely for maximum protection. Taking this step saves you from costly paint repairs and ensures a professional-looking finish.
Setting up a safe and well-lit workspace
A safe and efficient workspace is essential for restoring headlights. Choose a well-ventilated area, especially if you’re working indoors, to minimize exposure to chemical fumes. Organize your tools and materials beforehand to streamline the process. Bright, white lighting is crucial for accurately assessing the condition of the headlights and ensuring even polishing. Proper preparation of your workspace not only improves efficiency but also guarantees better results.
How to Polish Car Headlights at Home: Step-by-Step Process
Step 1: Initial cleaning with soap and water
Start by thoroughly cleaning your headlights to remove dirt, grime, and surface debris. Use a bucket of warm water mixed with car soap and a microfiber cloth. Gently scrub the headlights in circular motions, ensuring all visible contaminants are removed. Rinse with clean water and dry with a soft cloth. This step ensures a clean surface for the restoration process and prevents dirt from scratching the headlights during sanding.
Step 2: Wet sanding the headlights (grit progression: coarse to fine)
Wet sanding removes the oxidized layer and smooths the surface. Begin with 320-grit wet/dry sandpaper. Dip it in water and sand the headlight in horizontal strokes. Progress to 400-grit sandpaper, followed by 600-grit, to refine the surface. Keep the sandpaper and headlight wet throughout the process to avoid scratches. For heavily oxidized headlights, you may need to start with a coarser grit. This method restores the clarity of the lens by eliminating the foggy layer.
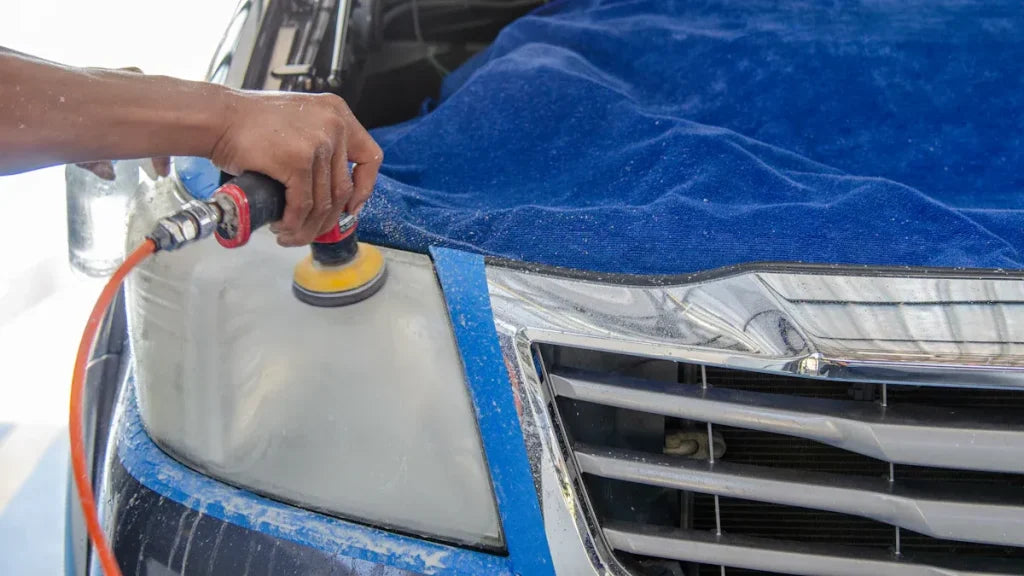
Step 3: Applying polishing compound for clarity
After sanding, apply a small amount of polishing compound to a clean microfiber cloth or a buffing pad attached to a drill. Rub the compound onto the headlight in circular motions, focusing on one section at a time. The compound restores clarity by polishing the surface and removing fine scratches. Wipe off any residue with a clean cloth to reveal a clearer lens.
Step 4: Buffing the headlights for a smooth finish
Buffing enhances the smoothness and shine of the headlights. Use a drill with a buffing pad or a soft microfiber cloth. Apply light pressure and move in circular motions to evenly distribute the polish. Users often report dramatic improvements in clarity and brightness after buffing. Some even describe their headlights as looking brand new, making this step crucial for achieving professional results.
Step 5: Sealing the headlights with UV protectant
Finish the process by applying a UV-protective sealant. This step prevents future oxidation and yellowing caused by sun exposure. Use a product like JetSeal or a similar UV protectant. Apply a thin, even layer over the headlight and let it cure as per the product instructions. This protective barrier prolongs the clarity of your headlights and ensures they remain in excellent condition for months.
Pro Tip: Regular maintenance, such as reapplying UV sealant every few months, can significantly extend the lifespan of your restored headlights.
Alternative Methods to Clean Foggy Headlights
Using toothpaste as a polishing agent
Toothpaste is a surprisingly effective solution for lightly fogged headlights. Its mild abrasives help remove surface oxidation and restore clarity. To use this method, apply a small amount of non-gel toothpaste to a damp microfiber cloth. Rub the toothpaste onto the headlight in circular motions, ensuring even coverage. After a few minutes, rinse the surface with clean water and dry it with a soft cloth. This method works best for minor discoloration and provides a quick, budget-friendly fix. However, it may not deliver long-lasting results without a UV sealant.
Tip: Use toothpaste containing baking soda for better results, as it enhances the abrasive effect.
Baking soda and water paste for light cleaning
Baking soda is another household item that can help clean foggy headlights. Mix two parts baking soda with one part water to create a thick paste. Apply the paste to the headlight using a microfiber cloth, rubbing gently in circular motions. Rinse thoroughly with water and wipe the surface dry. This method is ideal for removing light oxidation and grime. While it is cost-effective, it may not achieve the same level of clarity as professional-grade products.
Comparing household alternatives with professional products
Household methods like toothpaste and baking soda are convenient and affordable, but their performance differs significantly from professional restoration products. The table below highlights key differences:
|
Factor |
Professional Restoration |
DIY Kit |
|---|---|---|
|
Initial Clarity |
95-100% of original |
60-80% of original |
|
Longevity |
2-3+ years in coastal conditions |
3-6 months in coastal conditions |
|
UV Protection |
Commercial-grade sealants |
Basic consumer sealants |
|
Surface Quality |
Complete oxidation removal |
Surface-level improvement |
|
Light Output |
Restored to 90-95%+ of original |
Improved to 60-80% of original |
|
Process Detail |
8-12 step professional process |
3-4 step simplified process |
|
Long-Term Value |
$0.50-$0.75 per month over life |
$1.50+ per month with frequent reapplication |
While household alternatives can improve light output and clarity, they often lack the durability and UV protection of professional products. For heavily oxidized headlights or long-term results, investing in a professional restoration kit or service may be more cost-effective.
Note: Regular maintenance, such as reapplying UV sealant, can extend the effectiveness of both DIY and professional methods.
Maintenance Tips for Restoring Headlights at Home
Regular cleaning to prevent dirt buildup
Keeping your headlights clean is essential for maintaining their clarity and ensuring optimal visibility. Dirt, grime, and road debris can accumulate over time, leading to reduced light output. To prevent this, clean your headlights regularly using a microfiber cloth and a mild soap solution. Avoid abrasive materials that may scratch the surface. A simple cleaning routine can help you maintain up to 80% of your vehicle’s visibility, which is crucial for safety on the road. For added convenience, consider using a DIY restoration kit with user-friendly tools to simplify the process.
Reapplying UV sealant every few months
UV sealant plays a vital role in protecting your headlights from sun damage and oxidation. Reapplying it every few months ensures long-term clarity and prevents yellowing. This is especially important in coastal areas where high UV exposure and salt air accelerate lens degradation. The table below highlights the recommended reapplication frequency:
|
Recommendation |
Duration |
Rationale |
|---|---|---|
|
Reapply UV sealant |
Every 2-3 months |
High UV exposure and salt air in coastal areas accelerate oxidation and damage. |
By following this schedule, you can extend the lifespan of your restored headlights and maintain their brightness effectively.
Avoiding harsh chemicals that can damage the headlights
Using harsh chemicals can cause irreversible damage to your headlights. Products containing ammonia or bleach may degrade the plastic lens, leading to cloudiness or discoloration. Instead, opt for gentle cleaning agents like baking soda paste or non-gel toothpaste for light maintenance. These household items are effective yet safe for your headlights. Always prioritize safety first by wearing gloves and working in a well-ventilated area when handling any cleaning products.
Pro Tip: Combine regular cleaning, UV sealant application, and the use of safe cleaning agents to keep your headlights in top condition for years.
Restoring headlights at home offers numerous benefits. It improves visibility, enhances safety, and saves money compared to professional services, which can cost $130.00 to $430.00. The process is simple: remove foggy layers, polish lenses, and apply UV protectant. DIY methods effectively address oxidized and hazy headlights, ensuring long-lasting clarity and optimal light output.
Share:
Ceramic vs Metallic Brake Pads: What Every Driver Should Know in 2025
How Carbon Fiber Body Kits Enhance Lamborghini Speed and Handling