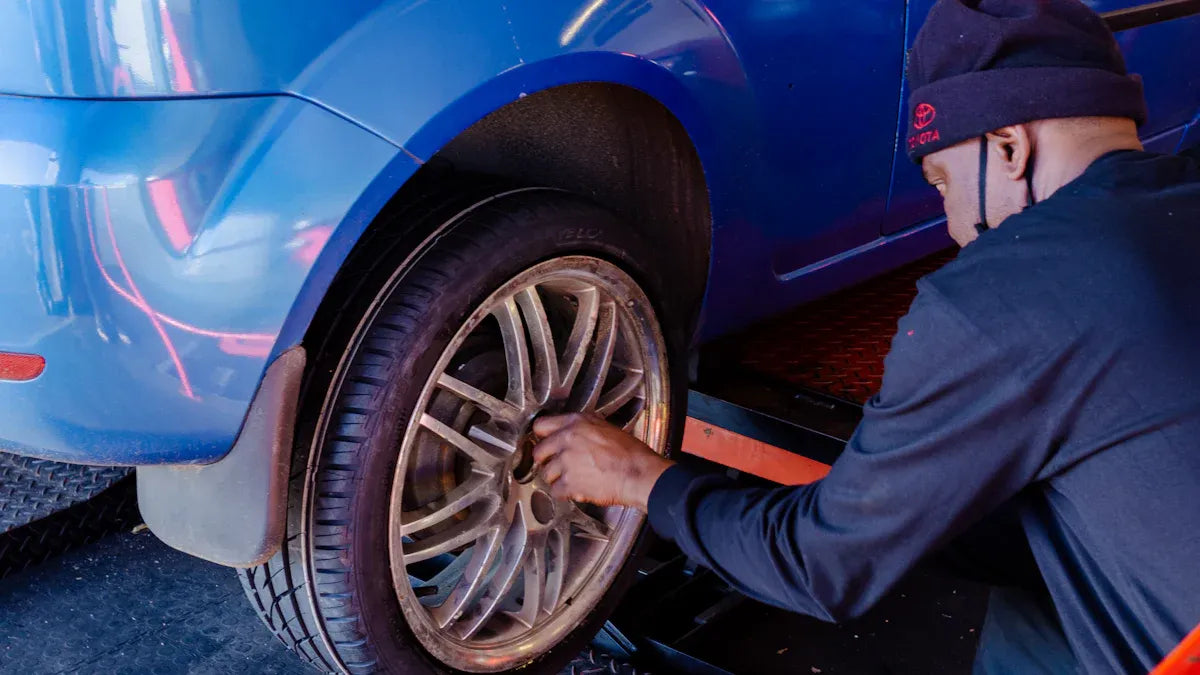


Balancing new wheels at home enhances your vehicle’s performance while saving money. It reduces vibrations and ensures even tire wear. You need precision and patience to succeed. Learning how to balance new wheels equips you to achieve smoother rides and longer tire life. This DIY task rewards effort with visible improvements.
Key Takeaways
-
Balancing wheels at home helps your car work better. It also makes tires last longer and reduces shaking.
-
Tools you need for balancing include a bubble balancer, wheel weights, a tire iron, and a torque wrench. These tools are cheap and simple to use.
-
Look for signs like shaking, uneven tire wear, or the car pulling to one side. Fixing these problems early avoids more damage and keeps you safe.
Tools and Equipment for Balancing New Wheels
Balancing your wheels at home requires the right tools to ensure accuracy and efficiency. Whether you’re a beginner or an experienced DIY enthusiast, having the proper equipment is essential for achieving professional results.
Essential Tools for DIY Wheel Balancing
To get started, you’ll need a few basic tools that are indispensable for balancing wheels at home. These tools help you identify imbalances and make the necessary adjustments:
-
Bubble Balancer: This is one of the most cost-effective tools for DIY wheel balancing. It uses a simple mechanism to detect uneven weight distribution. While it’s less precise than advanced machines, it’s a great starting point for smaller operations.
-
Wheel Weights: These small weights are crucial for correcting imbalances. They come in various types, such as clip-on or adhesive weights, and are available in different sizes to suit your needs.
-
Tire Iron or Pry Bar: You’ll need this tool to remove and reinstall tires during the balancing process. A sturdy tire iron ensures you can work efficiently without damaging the wheel.
-
Torque Wrench: Properly securing your wheels after balancing is vital for safety. A torque wrench allows you to tighten lug nuts to the manufacturer’s specifications.
These tools are relatively affordable and easy to use, making them ideal for beginners learning how to balance new wheels.
Optional Tools for Enhanced Accuracy
For those looking to achieve greater precision or handle more complex tasks, investing in advanced equipment can make a significant difference. While these tools come at a higher price point, they offer enhanced functionality and ease of use:
-
Dynamic Balancers: These machines use advanced technology to provide precise balancing. They are more expensive but deliver professional-grade results, especially for larger or high-performance vehicles.
-
Static Balancers: A simpler alternative to dynamic balancers, these tools are less costly but less accurate. They are suitable for basic balancing tasks.
-
Tire Mounting Machines: If you frequently mount and balance tires, a tire mounting machine can save time and effort. For example, the Ranger R980AT features an assist arm that simplifies the process, making it a worthwhile investment for regular use.
-
Leverless Systems: These premium tools automate the mounting process and reduce the risk of injury. They are ideal for those handling multiple tire sizes or working with heavy-duty tires.
Tip: If you plan to balance wheels regularly, consider the long-term cost benefits of investing in advanced equipment. For instance, a tire mounting machine and wheel balancer can cost around $7,895 but may pay for themselves after mounting 61 sets of tires.
By combining essential tools with optional upgrades, you can tailor your setup to match your needs and budget. This flexibility allows you to balance wheels effectively, whether you’re working on a family sedan or a heavy-duty truck.
How to Balance New Wheels: Step-by-Step Guide
Preparing Your Workspace and Inspecting Wheels
Before you begin balancing your wheels, you need to prepare your workspace and inspect the wheels thoroughly. A clean, organized area ensures safety and efficiency during the process. Follow these steps to set up your workspace and inspect your wheels:
-
Choose a flat, stable surface. This prevents errors caused by uneven ground. A garage floor or driveway works well.
-
Wear safety gear. Steel-toed boots and gloves protect you from potential injuries.
-
Inspect the wheels. Look for cracks, dents, or uneven tread wear. Replace damaged tires to avoid further issues.
-
Remove center caps and old wheel weights. This step ensures accurate balancing results.
Tip: Always check the tire pressure before starting. Proper inflation is crucial for accurate balancing and optimal performance.
Using a Bubble Balancer or DIY Setup
A bubble balancer is a practical and affordable tool for DIY enthusiasts learning how to balance new wheels. It works by detecting uneven weight distribution. Here’s how you can use it effectively:
-
Place the bubble balancer on a level surface. Ensure it is stable to avoid inaccurate readings.
-
Mount the wheel onto the balancer. Center it carefully to ensure proper alignment.
-
Observe the bubble. If it is off-center, the wheel has an imbalance.
-
Mark the heavy spot. Use chalk or a marker to identify where the imbalance occurs.
Many home mechanics and professional race teams prefer bubble balancers due to their simplicity and portability. Unlike shop-style balancers, they do not require electricity, making them ideal for small spaces or racing environments.
Adding and Adjusting Wheel Weights
Once you’ve identified the imbalance, you can correct it by adding wheel weights. These weights counteract the uneven distribution and restore balance. Follow these steps:
-
Determine the required weight. Use the bubble balancer’s readings to estimate how much weight is needed.
-
Choose the appropriate type of weight. Adhesive weights work well for alloy wheels, while clip-on weights are suitable for steel rims.
-
Attach the weights. Place them on the marked spot. Ensure they adhere securely to prevent them from falling off during use.
-
Recheck the balance. Mount the wheel back onto the balancer to confirm the adjustment. Repeat the process if necessary.
Note: Proper placement of weights is critical. Even a slight misalignment can cause vibrations and reduce the effectiveness of the balancing process.
Reinstalling Wheels and Testing for Balance
After balancing the wheels, reinstall them on your vehicle and test for balance. This step ensures that the adjustments you made are effective. Here’s how to do it:
-
Secure the wheels. Use a torque wrench to tighten the lug nuts to the manufacturer’s specifications.
-
Test the balance. Drive the vehicle at various speeds to check for vibrations or wobbling.
-
Make adjustments if needed. If you notice any issues, repeat the balancing process to fine-tune the results.
Repeatability is essential in wheel balancing. Ensure the wheels are mounted correctly each time to achieve consistent results. Testing the balancer with a calibration weight can also help confirm its accuracy.
Pro Tip: Keep a record of your balancing efforts, including the amount and placement of weights. This information can be helpful for future maintenance.
Signs Your Wheels Need Balancing
Common Indicators of Imbalance
Recognizing the signs of wheel imbalance is crucial for maintaining your vehicle’s performance and safety. Imbalanced wheels can lead to several noticeable symptoms that you should address promptly:
-
Vibrations while driving: You may feel vibrations in the steering wheel or throughout the cabin, especially at higher speeds. This is one of the most common indicators of imbalance.
-
Uneven tread wear: If your tires show irregular or rapid wear patterns, it could mean the wheel-tire assembly is out of balance.
-
Increased fuel consumption: Imbalanced wheels force your vehicle to work harder, leading to reduced fuel efficiency.
-
Pulling to one side: When your vehicle drifts to one side, it may indicate an alignment issue or unbalanced tires.
Note: Neglecting these signs can result in long-term damage to your suspension system and higher maintenance costs. Addressing imbalances early ensures a smoother ride and prolongs tire life.
Why Even New Wheels May Require Balancing
You might assume that new wheels are perfectly balanced, but this is not always the case. Minor imbalances can occur during manufacturing or installation. Here’s why even new wheels may need balancing:
-
Unequal weight distribution: Tire materials may have slight inconsistencies, causing uneven weight distribution. Balancing corrects these imperfections with wheel weights.
-
Bead seating issues: If the tire beads do not seat properly on the rim, it can lead to imbalances. Twisting of the beads during installation may also create uneven stiffness in the sidewall.
-
Defective tires: Excessive weight required for balancing might indicate a manufacturing defect or improper mounting.
Learning how to balance new wheels ensures that you can address these issues effectively. Even small adjustments can make a significant difference in your vehicle’s performance and safety.
Safety Tips for Balancing Wheels at Home
Creating a Stable and Safe Workspace
Establishing a stable and safe workspace is essential when balancing wheels at home. A well-prepared environment minimizes risks and ensures accurate results. Start by selecting a flat, solid surface, such as a garage floor or driveway. Uneven ground can compromise your tools’ accuracy and increase the likelihood of accidents. Keep the area well-lit to avoid errors and improve visibility during the process.
Organize your tools and materials within easy reach to reduce unnecessary movement. Cluttered spaces can lead to tripping hazards or misplaced equipment. Always wear appropriate safety gear, including gloves and steel-toed boots, to protect yourself from sharp edges or falling objects.
Did You Know? Nearly half of all accidents involving abrasive wheels result from unsafe work systems or operator errors. Adopting safety measures, such as maintaining a clean workspace and using tools correctly, significantly reduces these risks.
|
Evidence Type |
Details |
|---|---|
|
Accident Statistics |
Nearly half of all accidents involving abrasive wheels are due to an unsafe system of work or operator error. |
|
Safety Guidelines |
Users must adopt safety measures to minimize the risk of breakage and accidents when using abrasive wheels. |
Handling Tools and Weights Properly
Proper handling of tools and weights is critical for both safety and efficiency. Mishandling can lead to injuries or damage to your equipment. When lifting heavy wheels or weights, keep your back straight and lift with your legs to avoid strain. Use mechanical aids, such as carts or dollies, to transport heavier items. If the load is too heavy, enlist help to prevent overexertion.
Ensure all tools are in good condition before use. Damaged or worn-out tools can fail unexpectedly, causing accidents. Label weights clearly and store them in an organized manner to avoid confusion during the balancing process. When attaching weights to wheels, apply steady pressure to ensure they adhere securely.
|
Guideline |
Description |
|---|---|
|
Weight Limits |
Limit the weight of a load that is lifted. Be guided on weight limits. |
|
Mechanical Aids |
Use mechanical aids; many lifting accessories are available to help lift and move loads. |
|
Handling Protocols |
Keep your back straight, lift slowly, avoid twisting, and use tools like carts for heavy loads. |
By following these protocols, you can work efficiently while minimizing the risk of injury or equipment failure. Always prioritize safety over speed to achieve the best results.
Troubleshooting Common Issues
What to Do If Wheels Still Vibrate
Even after balancing your wheels, vibrations may persist. This issue often stems from factors beyond simple weight adjustments. Identifying the root cause is essential to resolving the problem effectively.
-
Unbalanced Tires: Tires may still have slight imbalances, especially noticeable at speeds above 50 mph. Recheck the balance and adjust weights as needed.
-
Damaged or Worn Tires: Inspect your tires for separated treads, sidewall bulges, or uneven wear. These issues can cause persistent vibrations and may require tire replacement.
-
Misaligned Wheels: Hitting a pothole or curb can misalign your wheels, leading to uneven tire wear and vibrations. Consider checking your vehicle’s alignment.
-
Drivetrain Problems: Worn CV joints or driveshafts can create vibrations during acceleration. These components may need professional inspection and repair.
Tip: Always test your vehicle at various speeds after balancing to identify any lingering issues. Addressing these promptly prevents further damage to your tires and suspension system.
When to Seek Professional Assistance
Sometimes, resolving wheel vibrations requires expertise and specialized tools. Knowing when to seek professional help ensures your safety and saves time.
-
If you remain unsure about the balance or notice persistent symptoms, consult a professional for accurate diagnostics.
-
Professional garages use advanced equipment to detect hidden issues, such as bent rims or internal tire defects, that may not be visible to the naked eye.
-
Even experienced DIY enthusiasts may benefit from professional assistance, especially when dealing with high-performance vehicles or complex problems.
Pro Tip: Regular maintenance by professionals not only resolves current issues but also provides recommendations for preventing future problems. This proactive approach enhances your vehicle’s performance and longevity.
By addressing these common issues and knowing when to involve a professional, you can ensure a smoother and safer driving experience.
Balancing new wheels at home empowers you to save money and improve your vehicle’s performance. With the right tools and techniques, you can achieve professional results. Prioritize safety throughout the process. If challenges arise, consult a professional to ensure optimal outcomes. Take pride in mastering this practical DIY skill.


Share:
The Most Iconic JDM Wheels for Cars of All Eras
Why Audi RS5 Forged Wheel Setup Stands Out